What you'll need
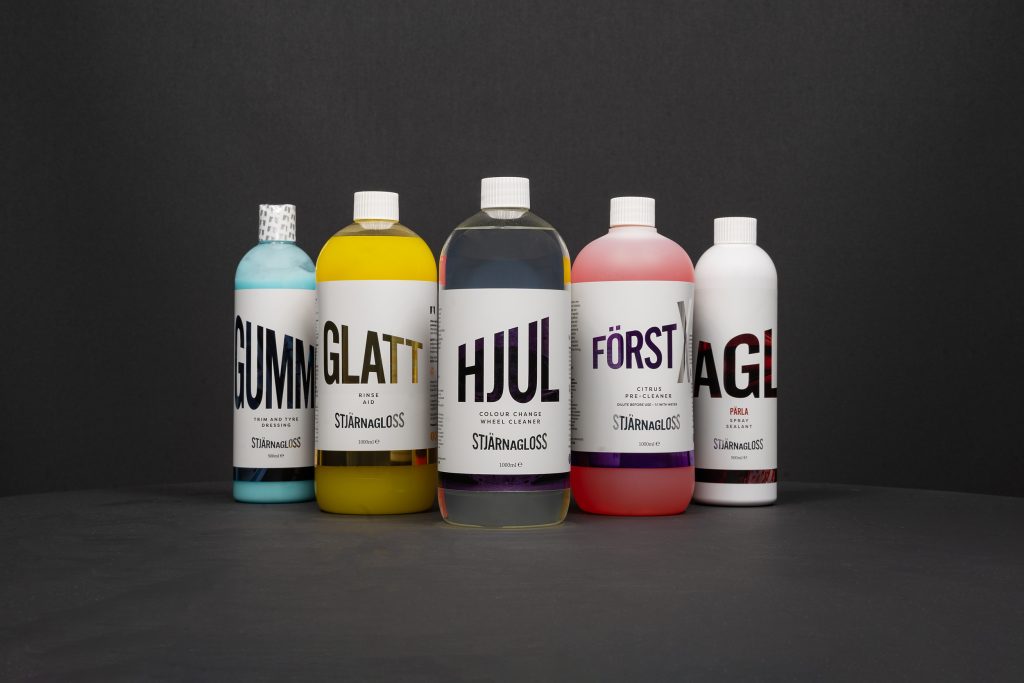
– Hjul Colour Change Wheel Cleaner
– Först Citrus Pre-Cleaner
– Pärla Spray Sealant
– Glatt Protective Rinse Aid
– Gummi Tyre Dressing
– Matta Shampoo or Bubblor Shampoo*
– Kantlos Microfibre Cloths – Long Pile & Short Pile
– Grävling Barrel Brush
– Skrubba Tyre Brush – Borsta Brush Kit
*If your vehicle is wrapped or a Matt finish we recommend using Matta Shampoo. For Gloss finish vehicles, use Bubblor Shampoo. As the vehicle shown is wrapped, we’re going to use the Matta Shampoo.
Prep / Pre-Clean
Step 1
Firstly, before we use any chemicals, we’re going to rinse the wheels using a pressure washer. We want to get rid of as much dirt as possible because this is free. Contrary to what you might see on social media, Stjarnagloss included, you don’t want to put any chemicals onto a dirty wheel because this is wasting a lot of product.
Cleaning Wheels
Step 2
Now the wheels are three or four shades lighter, but there is still dirt built up, especially in the corners and crevices. Now we’re going to grab the Hjul Colour Changing Wheel Cleaner and spray the wheel. Remember to change the angle of approach because the wheel has lots of corners and crevices. Making sure to get into the barrels, especially on these sort of wheels, you can really see the barrels from the outside of the car. Next grab your bottle of Först and give the tyres a spray then we will give that 20 – 30 seconds to do its thing, let the magic happen and see the Purple Rain.
Step 3
Now, thats had 30 – 45 seconds to do its thing, we’re going to approach it with a contact wash. We’re putting some Matta Shampoo into a bucket, or Bubblor Shampoo, and agitate that with a pressure washer. Then we can get our Borstar Brush and start hitting those contaminated areas. Once the faces are done, grab your Grävling Barrel Brush and give the barrels a good scrub. This particular car has got some big old stoppers so we’re going to move forward a couple of feet so we can get into the barrel behind the callipers.
Cleaning Your Tyres
Step 4
The faces & the barrels are now clean so we’re going to spend a couple of minutes cleaning the tyres. This may feel a little bit like “ooh my God, I’m being a bit sad here, I’m cleaning the tyres” but it’s going to lay a beautiful foundation later on when we put the Gummi Tyre Dressing on. This is going to allow the dressing to soak in, give a more consistent satin sheen & help the product last longer.
Stjarnagloss do not believe in dedicated tyre cleaners so we’re going to grab the Först Citrous Pre-wash again, spray some onto the tyre wall and some onto the brush then scrub.
Once you’re done scrubbing the tyre, you’re going to rinse and you will repeat this step until the bubbles run white.
Cleaning Your Arches
Step 5
Now we’re going to get super geeky and clean the inner arches. You might be thinking “That’s got nothing to do with the wheels” but it’s right next to the wheels and if you’ve got a lovely clean wheel but a dirty inner arch liner, people are going to be judging you, me included.
For this, we’re going to grab some more Först, the bucket of Shampoo & a Grävling Barrel Brush. Start by giving the arches a good spray of Först then dip your brush into your shampoo and give the arches a good scrub. Then rinse once complete.
Tyre Dressing
Step 6
Don’t forget, you’re never fully dressed without a Tyre Shine. Grab your bottle of Gummi Tyre Dressing, a foam applicator and apply. Gummi will hold on for approximately 1 month, depending on conditions, giving the tyre walls a beautiful, wet, satin finish. Not glossy, It’s not the nineties but this will make your wheels look much smarter.
Little tip: If you want to get super geeky, a couple of sprays of Quick Detailer on the inner arch liner is going to give it a satin finish. Unfortunately this is only going to hold on for a couple of hours, but ideal at shows.
Protecting Your Wheels
Glatt VS Pärla
Now we’ve got clean wheels, we need to get into the conversation of protection. Below I’m going to show you two versions, the Lazy Boy version, which is Glatt, & the longer lasting version, which is Pärla.
These two products work beautifully in conjunction with one another. Glatt is going to hold on for approximately 1 month, Pärla is going to hold on for approximately 3 months. We recommend twice a year, protect your wheels with Pärla. Then, every time you wash the car thereafter, give the wheels a rinse with Glatt. You are never going to run out of protection & this will make your wheels so much easier to clean down the road.
How to use Glatt
At the moment, we’ve got a clean but flat and unprotected wheel. Glatt protective rinse aid is a game changer. You don’t need to do anything.
Simply spray the wheels with Glatt, you will instantly see mad beads, now all you need to do is rinse that off.
Easy as Glatt.
How to use Pärla
For this product we recommend removing the wheels so you can protect the faces and the barrels. If you don’t want to remove your wheel that’s fine however you will only be able to protect the faces.
To protect the wheel, we’re going to grab a bottle of Pärla Spray Sealant & 2 Microfibre cloths, 1 short pile & 1 long pile.
Start by spraying a good coating of Pärla onto the face of the wheel. You’re going to take the short pile microfibre cloth and work Pärla into all those nooks and crannies.
Once you’ve worked that layer on the face of the wheel, grab your long pile microfibre cloth and repeat the short pile step.
The reason we use 2 microfibre cloths is because the short pile isn’t as absorbent. There’s more chance of you pushing the product round into all the corners and crevices. Then the long pile is going to slurp up all the excess product that we don’t need as it’s more absorbent, whilst buffing the product giving a better finish.
Once you have completed the face of the wheel, repeat on the barrel. You are going to have a little bit of overspray on the barrels from doing the faces. If this dries, don’t worry because the product is going to re-activate so you can spread again.
Once complete you will have a beautiful, glossy finish with an extremely smooth, protected surface. This means that mud and brake dust has less chance of latching on, making your wheels easier to clean and maintain down the road
There is method to the madness.
Maximum Protection
Ceramic Coating
For maximum protection, we can go one step further and get the wheels Ceramic Coated. There are plenty of Automotive Detailers up & down the country. Unfortunately, with ceramic coatings, they’re not foolproof, mistakes can happen. You get high spots, which means the wheel will have to be refurb if you get it wrong. Therefore, I do advise you to let a professional do this for you.
FAQ's
Absolutely! The winter months are the worst time of the year for wheels as they endure the horrible UK weather & the longer you leave wheels with brake dust or dirt the harder it is to remove.
For maximum protection we recommend using Pärla & Glatt. Before winter begins protect the wheels with Pärla, this is going to give the wheels a protective film helping prevent brake dust & road dirt from latching on. Then every time you clean the car through winter, give the wheels a quick scrub and rinse it with Glatt.
This prevents brake dust & dirt from building up on your wheels which would make them harder to clean once summer comes back round.
Alloy Wheels have different finishes: Gloss, Satin, Matt & Textured Matt and this guide isn’t a one size fits all.
– If you’ve got Gloss or Satin finish wheels then you can use everything shown in this guide. Gloss wheels are the easiest to clean & maintain.
– If you have Matt finish wheels you can use all the cleaners but you will want to avoid using Glatt & Pärla as these will give the wheels a Glossy finish.
– If you have Textured Matt wheels that are rough to touch. Unfortunately, you can’t really protect them. You can use all the cleaners, no problems at all, however you cannot use the Glatt or Pärla protection. This is because Glatt & Pärla are going to try fill in those gaps or texture and you’re going to be left with a bit of a mess. There are some dedicated ceramic coatings and fair play to them, but you will need to do a little bit of research before hand.
Long story short, Don’t try protecting Textured Matt wheels unless you’ve got a dedicated Ceramic Coating.
Yes, you can. Glatt & Pärla can be used individually, you don’t need to use both products. We recommend to use both as this give maximum protection all year round. If you decide to only buy one of them then you can skip that section above.
For the best result we recommend using 2 different types of brushes:
- Grävling microfibre Barrel brush – This will allow you to clean inside the barrel of the wheel and you will reach all the way to the back of the barrel.
- Borstar Hog Hair Brush Set – These will get into all the corners and crevices of the wheel.
These brushes will remove the brake dust or dirt without scratching the wheel.
What ever brush you choose, you do not want to use a brush with a wire centre as this will scratch the paint of the wheels especially after a few washes when the centre rusts.
Yes, we recommend using the 2 bucket method as this helps reduce to chances of scratching the wheels. We also recommend using a grit guard in the bucket so that any grit on your brush will drop below where you will dip your brush also helping reduce the chance of scratching wheels .
